Building and Running
These instructions assume you are using a Bash shell. You can easily get a Bash shell on Windows by installing the git client.
Prerequisites
You need to install following in order to build MAGDA:
- Node.js - To build and run the TypeScript / JavaScript components, as well as many of the build scripts. Requires Node 22.
- Java 8 JDK - To run the JVM components, and to build the small amount of Java code.
- sbt - To build the Scala components.
- yarn - Npm replacement that makes node deps in a monorepo much easier.
To push the images and run them on kubernetes, you’ll need to install:
- GNU tar - (Mac only) MacOS ships with
BSD tar. However, you will needGNU tarfor docker images operations. On MacOS, you can installGNU Tarvia Homebrew:brew install gnu-tar - gcloud - For the
kubectltool used to control your Kubernetes cluster. You will also need to this to deploy to our test and production environment on Google Cloud. - Helm 3 to manage kubernetes deployments and config. Magda
0.0.57and higher requires helm 3 to deploy. - Docker - Magda uses
dockercommand line tool to build docker images.
You’ll also need a Kubernetes cluster - to develop locally this means installing either minikube or docker (MacOS only at this stage). We’ve also started trialing microk8s on Linux, but we’re not sure how well it’s going to work long-term. Potentially you could also do this with native Kubernetes, or with a cloud cluster, but we haven’t tried it.
Trying it out locally without building source code
If you just want to try it out locally without actually changing anything, it’s much easier to just install minikube or docker for desktop, then following the instructions at https://github.com/magda-io/magda-config/blob/master/existing-k8s.md. What follows is instructions on how to build everything, code, databases and all, from scratch into a working application.
Building and running (just) the frontend
If you just want to edit the UI, you don’t actually even need helm -
just clone the repo, run yarn install at the root, then cd magda-web-client and run yarn run dev.
This will build/run a local version of the client, connecting to the API at https://dev.magda.io/api.
If you want to connect to a magda API hosted elsewhere you can modify the config.ts file in the client.
Building and running the backend
First clone the magda directory and cd into it.
Then install dependencies and set up the links between components by running:
yarn install
Once the above prerequisites are in place, and the dependencies are installed, building MAGDA is easy. From the MAGDA root directory, simply run the appropriate build command:
yarn lerna run build --stream --concurrency=1 --include-dependencies
You can also run yarn build in an individual component’s directory (i.e. magda-whatever/) to build just that component.
Set up Helm
Helm is the package manager for Kubernetes - we use it to make it so that you can install all the various services you need for MAGDA at once. To install, follow the instructions at https://helm.sh/docs/intro/install/.
Once you have helm3 installed, add Magda Helm Chart Repo and other relavent helm chart repos:
helm repo add twuni https://helm.twun.io
# Get update from repos
helm repo update
Install a local kube registry
This gives you a local docker registry that you’ll upload your built images to so you can use them locally, without having to go via DockerHub or some other external registry.
helm install docker-registry -f deploy/helm/docker-registry.yml twuni/docker-registry
helm install kube-registry-proxy -f deploy/helm/kube-registry-proxy.yml magda-io/kube-registry-proxy
Install kubernetes-replicator
A complete Magda installation includes more than one namespaces and kubernetes-replicator helps to automated copy required secrets from main deployed namespace to workload (openfaas function) namespace.
To install kubernetes-replicator:
1> Add kubernetes-replicator helm chart repo
helm repo add mittwald https://helm.mittwald.de
2> Update Helm chart repo
helm repo update
3> Create a namespace for kubernetes-replicator
As you only need one kubernetes-replicator instance per cluster, it’s a good idea to install kubernetes-replicator in a seperate namespace.
kubectl create namespace kubernetes-replicator
3> Install kubernetes-replicator
helm upgrade --namespace kubernetes-replicator --install kubernetes-replicator mittwald/kubernetes-replicator
Please note: you only need to install
kubernetes-replicatoronce per k8s cluster
Build local docker images
Now you can build the docker containers locally - this might take quite a while so get a cup of tea.
eval $(minikube docker-env) # (If you're running in minikube and haven't run this already)
yarn lerna run build --stream --concurrency=1 --include-dependencies # (if you haven't run this already)
yarn lerna run docker-build-local --stream --concurrency=1 --include-dependencies
Build Connector and Minion local docker images
As of v0.0.57, Magda official connectors & minions live outside the core repository. You can find connector & minions repositories at here.
You don’t have to build connector & minions docker images as the default config value file minikube-dev.yml specifically set to use official production-ready docker image from docker hub repository.
If you do want to use local build connector & minion docker images for testing & development purpose, you need to:
- Clone the relevant connector or minion repository
- Build & Push docker image to a local docker registry.
Run the following commands from the cloned folder:
yarn install
yarn run build
eval $(minikube docker-env)
yarn run docker-build-local
- Modify
minikube-dev.yml, remove theglobal.connectors.image&global.minions.imagesection. - Deploy Magda with helm using the instructions provided by the Install Magda on your minikube/docker-desktop cluster section below.
Windows only: Set up a volume for Postgres data
If you’re using Docker Desktop on Windows, you’ll need to set up a volume to store Postgres data because the standard strategy approach - a hostpath volume mapped to a Windows share - will result in file/directory permissions that are not to Postgres’s liking. Instead, we’ll set up a volume manually which is just a directory in the Docker Desktop VM’s virtual disk. We use the unusual path of /etc/kubernetes because it is one of the few mount points backed by an actual virtual disk.
kubectl apply -f deploy/kubernetes/local-storage.yaml
kubectl apply -f deploy/kubernetes/local-storage-volume.yaml
Note: If using docker desktop for Windows older than version 19, change the value from “docker-desktop” to “docker-for-desktop” in nodeAffinity in file deploy/kubernetes/local-storage-volume.yaml
Install Magda on your minikube/docker-desktop cluster
# update magda helm repo
helm repo update
# update magda chart dependencies
yarn update-all-charts
# deploy the magda chart from magda helm repo
helm upgrade --install --timeout 9999s -f deploy/helm/minikube-dev.yml magda deploy/helm/local-deployment
If you need HTTPS access to your local dev cluster, please check this doc for extra setup steps.
This can take a while as it does a lot - downloading all the docker images, starting them up and running database migration jobs. You can see what’s happening by opening another tab and running kubectl get pods -w.
Also note that by default there won’t be any minions running, as some of them can be very CPU intensive. You can toggle them on by specifying --set tags.minion-<minionname>=true when you run helm upgrade.
If you’re using Docker Desktop on Windows, add -f deploy/helm/docker-desktop-windows.yml too, i.e. do this instead of the above:
# update magda helm repo
helm repo update
# update magda chart dependencies
yarn update-all-charts
# deploy the magda chart from magda helm repo
helm upgrade --install --timeout 9999s -f deploy/helm/docker-desktop-windows.yml -f deploy/helm/minikube-dev.yml magda deploy/helm/local-deployment
If you want to deploy the packed & production ready helm chart in our helm repo, please check out this sample config repo.
Crawl Data
By default, helm will create a one-time crawl job for data.gov.au to get you started. If you want to crawl other datasets, look at the config under connectors: in deploy/helm/minikube-dev.yml. For sources of data, check out deploy/helm/magda-dev.yml. Once you’ve changed your config, just run the helm upgrade command above again to make it happen.
Kubernetes tricks
Running individual services
If you want to just start up individual pods (e.g. just the combined database) you can do so by setting the all tag to false and the tag for the pod you want to true, e.g.
helm install --name magda deploy/helm/magda -f deploy/helm/minikube-dev.yml --set tags.all=false --set tags.combined-db=true
You can find all available tags (sub charts) in deploy/helm/magda-core/Chart.yaml and deploy/helm/magda/Chart.yaml
You can also find more information from our Helm Charts Document.
Once everything starts up, you can access the web front end on http://192.168.99.100:30100. The IP address may be different on your system. Get the real IP address by running:
minikube ip
It’s a good idea to add an entry for minikube.data.gov.au to your hosts file (C:\Windows\System32\drivers\etc\hosts on Windows), mapping it to your Minikube IP address. Some services may assume this is in place. For example:
192.168.99.100 minikube.data.gov.au
Running on both host and minikube
It’s also possible to run what you’re working on your host, and the services your dependent on in minikube. Depending on what you’re doing, this might be simple or complicated.
Using the minikube database
This is super-easy, just run
kubectl port-forward combined-db-postgresql-0 5432:5432
# or kubectl port-forward combined-db-0 5432:5432 prior to Magda v1.0.0
Now you can connect to the database in minikube as if it were running locally, while still taking advantage of all the automatic schema setup that the docker image does.
Running a microservice locally but still connecting through the gateway
You might find yourself developing an API locally that depends on authentication, which is easiest done by just logging in through the web interface and connecting through the gateway. You can actually make this work by telling the gateway to proxy your service to 192.168.99.1 in deploy/helm/internal-charts/gateway/templates/configmap.yaml. For instance, if I wanted to run the search api locally, I’d change configmap.yaml like so:
data:
  # When the config map is mounted as a volume, these will be created as files.
  routes.json: '{
    "search": {
        "to": "http://192.168.99.1:6102/v0"
    },
    # ...etc
Then update helm:
helm upgrade magda -f deploy/helm/minikube-dev.yml deploy/helm/local-deployment
Now when I go to http://${minikube ip}/api/v0/search, it’ll be proxied to my local search rather than the one in minikube.
Be aware that if your local service has to connect to the database or other microservices in minikube you’ll have to use kube-port-forward to proxy from localhost:{port} to the appropriate service in minikube - you can find a list of ports at https://github.com/magda-io/magda/blob/master/doc/local-ports.md.
In the likely even you need to figure out what the jwt shared secret is on your minikube, you can cheat by opening up a shell to a container that has that secret and echoing the environment variable:
kubectl exec -it gateway-cf9c575bb-th57x -- /bin/bash
echo $JWT_SECRET
Running local minions
You can use the same pattern for minions - register a webhook with a url host of 192.168.99.1 and it’ll post webhooks to your local machine instead of within the minikube network. Be aware that your minion won’t be able to find the registry until you use kubectl port-forward to make it work… e.g.
kubectl port-forward registry-api-79f7bf7787-5j52x 6101:80
What do I need to run?
Running individual components is easy enough, but how do we get a fully working system? It is rarely necessary to run all of MAGDA locally, but various components depend on other components as follows:
| Component | Dependencies |
|---|---|
magda-*-connector |
magda-registry-api |
magda-*-minion |
magda-registry-api |
magda-authorization-api |
magda-postgres, magda-migrator-combined-db |
magda-gateway |
magda-registry-api, magda-search-api, magda-web-client, magda-authorization-api, magda-discussions-api |
magda-indexer |
magda-elastic-search |
magda-registry-api |
magda-postgres, magda-migrator-combined-db |
magda-search-api |
magda-elastic-search |
magda-web-client |
magda-web-server, but uses API at https://dev.magda.io/api if server is not running. |
magda-web-server |
none, but if this is running then magda-gateway and its dependencies must be too or API calls will fail. |
Architecture Diagram
The following Architecture Diagram may help you to get clearer idea which components you need to run in order to look at a particular function area:
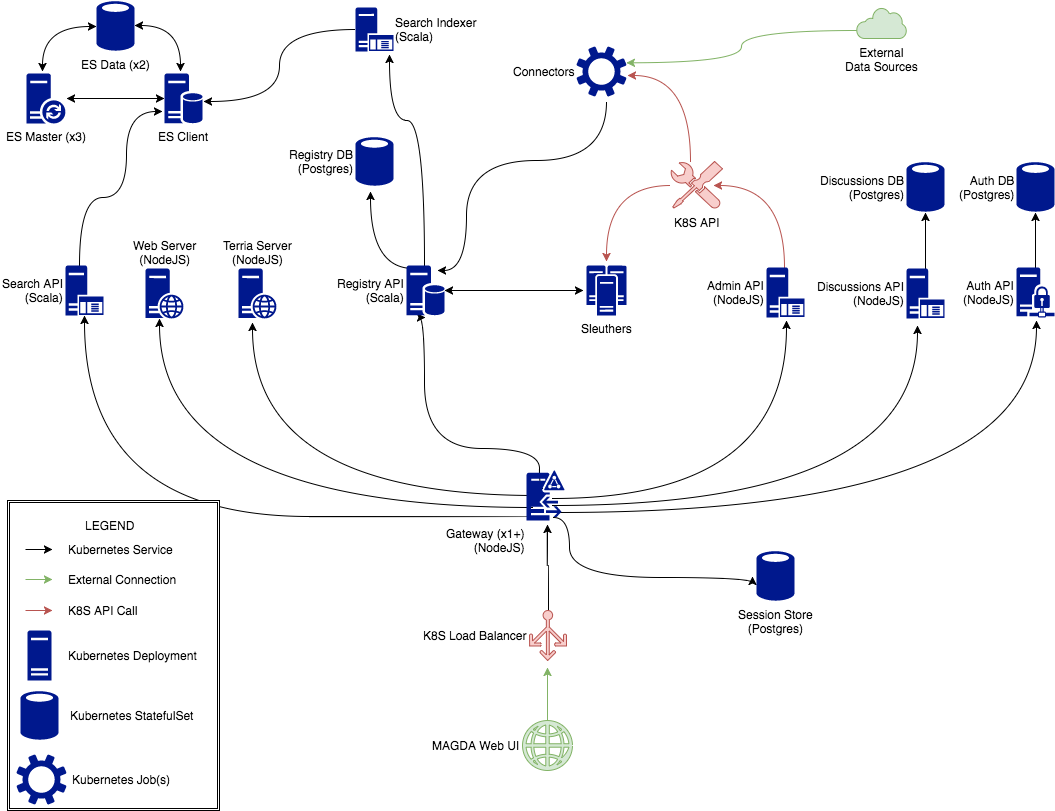
The following table shows the relationship between Magda components and Diagram elements:
| Component | Diagram elements |
|---|---|
magda-admin-api |
Admin API (NodeJS) |
magda-*-connector |
Connectors |
magda-opensearch |
OpenSearch Client, OpenSearch Data (x2), OpenSearch Master (x3) |
magda-*-minion |
Minions |
magda-authorization-api |
Auth API (NodeJS) |
magda-gateway |
Gateway (x1+) (NodeJS) |
magda-indexer |
Search Indexer (Scala) |
magda-registry-api |
Registry API (Scala) |
magda-search-api |
Search API (Scala) |
magda-web-client |
MAGDA Web UI |
magda-web-server |
Web Server (NodeJS) |
magda-preview-map |
Terria Server (NodeJS) |
magda-postgres |
All databases - see the migrators that set up the individual database schemas below |
magda-migrator-authorization-db |
Auth DB (Postgres). magda-migrator-authorization-db is only used for production environment. |
magda-migrator-discussions-db |
Discussion DB (Postgres). magda-migrator-discussions-db is only used for production environment. |
magda-migrator-registry-db |
Registry DB (Postgres). magda-migrator-registry-db is only used for production environment. |
magda-migrator-session-db |
Session DB (Postgres). magda-migrator-session-db is only used for production environment. |
magda-migrator-combined-db |
Registry DB (Postgres), Session DB (Postgres), Discussion DB (Postgres), Auth DB (Postgres). magda-migrator-combined-db component is only used for dev environment. Production environment will launch all DB components above separately. |
Running on your host machine
You can also avoid minikube and run magda components on your local machine - this is much, much trickier. In any component (except databases/elasticsearch), you can run:
yarn run dev
This will build and launch the component, and automatically stop, build, and restart it whenever source changes are detected. In some cases (e.g. code generation), it is necessary to run yarn run build at least once before yarn run dev will work. Typically it is not necessary to run yarn run build again in the course of development, though, unless you’re changing something other than source code.
A typical use case would be:
- Start
combined-dbinMinikubeusinghelm:
From root level of the project directory:
helm install --name magda deploy/helm/magda -f deploy/helm/minikube-dev.yml --set tags.all=false --set tags.combined-db=true
- Port forward database service port to localhost so that your local running program (outside the
Kubernetescluster inminikube) can connect to them:
# Port forward database
# this command doesn't terminate, so run it in a separate terminal
kubectl port-forward combined-db-postgresql-0 5432:5432
# or kubectl port-forward combined-db-0 5432:5432 prior to Magda v1.0.0
- Start the registry API by executing the following command
cd magda-registry-api && yarn run dev
- (Optional) If later you wanted to start elastic search as well:
Like combined-db, elastic search can only be started in minikube via helm rather than yarn run dev.
You need to upgrade previously installed helm chart magda to include magda-elastic-search component:
helm upgrade magda deploy/helm/local-deployment -f deploy/helm/minikube-dev.yml --set tags.all=false --set tags.combined-db=true --set tags.elasticsearch=true
And then, port forward elasticsearch so that you can run other components that may need to connect to elasticsearch outside the minikube:
# Port forward elasticsearch
# this commands doesn't terminate, so run it in a separate terminal
kubectl port-forward es-data-0 9300:9300
Debugging Node.js / TypeScript components
Node.js / TypeScript components can easily be debugged using the Visual Studio Code debugger. Set up a launch configuration like this:
{
    "type": "node",
    "request": "launch",
    "protocol": "inspector",
    "name": "Launch CKAN Connector",
    "runtimeExecutable": "${workspaceRoot}/scripts/node_modules/.bin/ts-node",
    "windows": {
        "runtimeExecutable": "${workspaceRoot}/scripts/node_modules/.bin/ts-node.cmd"
    },
    "runtimeArgs":[
        "src/index.ts"
    ],
    "args":[
        "--name", "data.gov.au", "--sourceUrl", "https://data.gov.au/"
    ],
    "cwd": "${workspaceRoot}/magda-ckan-connector"
}
Debugging Scala components
Scala components can easily be debugged using the IntelliJ debugger. Create a debug configuration for the App class of whatever component you’re debugging.
How to create local users
Please see document: How to create local users
How to create API key
Please see document: How to create API key